
It is so hard to believe that we are less than a week away from Halloween! I’m still trying to accept that the holidays will inevitably be different this year, and am already lamenting all of the holiday fairs, big family dinners, and parties that will look so different in 2020.

Even though we all won’t be able to follow our typical traditions, there are still so many things we can do to make the holidays feel more normal. For me, this will absolutely be sharing the love through fun baked goods, and these meringue cookies are just the first of many holiday cookies I’ll be creating and sharing this year!
Meringues are light and airy cookies, and guess what – they are also gluten-free! They are made up of only egg whites, granulated sugar, cream of tartar, and extract. Such simple ingredients for a melt-in-your-mouth, delicious cookie!
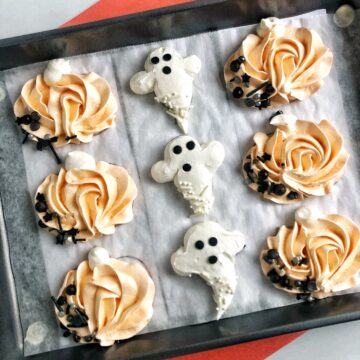
These little pumpkin and ghost meringue cookies would be a perfect addition to your Halloween Party!
Ingredients You Will Need:
- Egg whites (room temperature)
- White Sugar
- Vanilla Extract (or feel free to experiment with other extract flavors!)
- Cream of Tartar
- Sprinkles (I used the Wilton Star Mix and plain white sprinkles)
- Food Coloring (I used AmeriColor Pumpkin)
Supplies You Will Need:
- Electric Mixer (Stand Mixer or Hand Mixer)
- Large Baking Sheets
- Parchment Paper
- Piping Bag or Pastry Bag
- Piping Tips (Wilton 12 & 1M)
- Ghost and Pumpkin Templates (Halloween Meringue Cookie Downloads)
Stand Mixer Verus Hand Mixer
Okay, yes you can use either. BUT if you have a stand mixer, use it! It will save you time, energy, and maybe even a future case of carpal tunnel. Just kidding, but if you have access to a stand mixer, any recipe with a meringue base will be much easier. If not, you can absolutely still create the recipe to its full potential – but you will need to increase your beating times.
In this recipe, I have clocked all of the times with my Kitchenaid, but in the future, I will add a tutorial specific to meringues and hand mixing!
Preparing Your Cookie Sheets
Print out the template (Click here to download --> Halloween Meringue Cookie Downloads) and arrange over your cookie sheet. If needed, print out several pages and cut them in rows to better fit your tray. Now, lay out parchment paper over the templates.
Prepping for Your Meringue Cookies
Heat oven to 220 degrees. Prep your mixing bowl by making sure there are no traces of fat or grease present. Just give your clean bowl a quick wipe with a damp paper towel to be safe.
Now you will need to separate your egg whites. Egg whites will separate easier when cold, but the egg whites will need to be at room temperature for meringue. For separating, I have a handy little device (as pictured below). Make sure NO yolk sneaks into the egg white mixture.
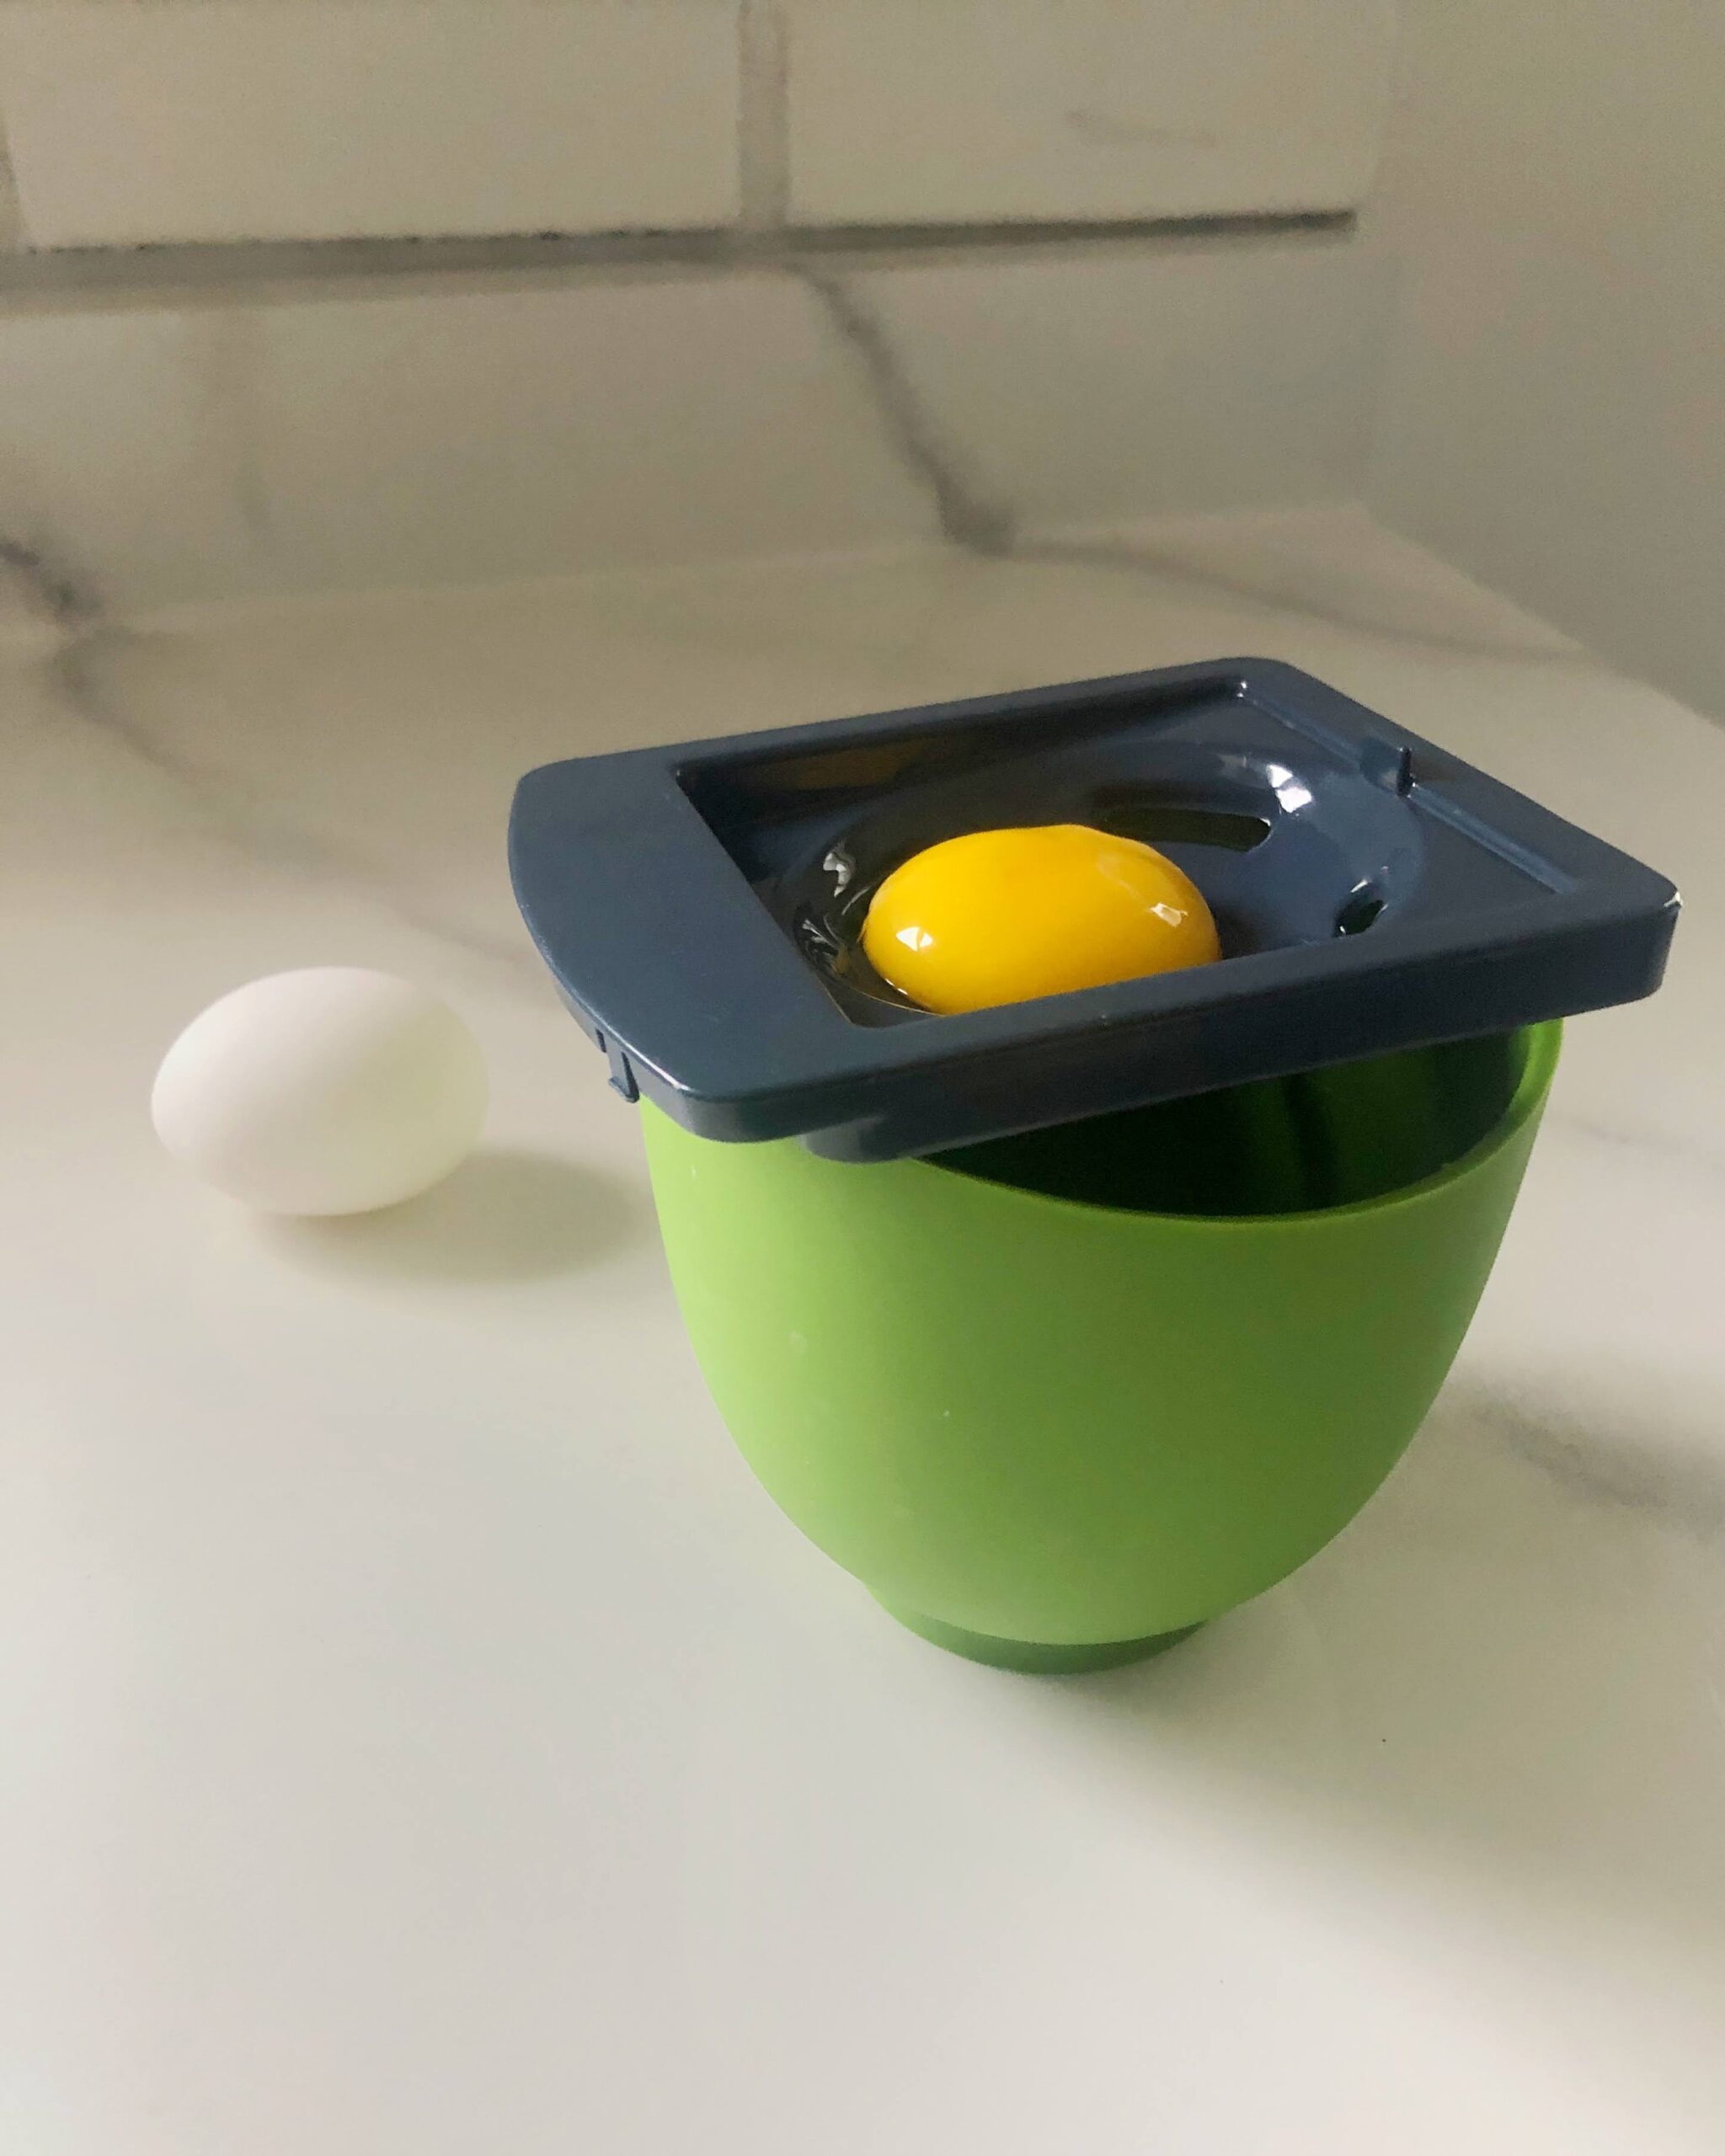
Add the egg whites, cream of tartar, and vanilla extract to your stand mixer with the whisk attachment. Cream of tartar is very important, as it will help to stabilize your egg whites and allow the stiff peaks to form.
What Kind of Vanilla Extract?
In this recipe, I used traditional vanilla extract with a dark amber tint. If you want to be absolutely sure your ghosts are as white as possible, I would recommend using a clear vanilla extract. However, even with the dark-colored vanilla, I was still able to achieve an almost completely white color – so this will come down to your personal preference.
Whipping Up Your Meringue
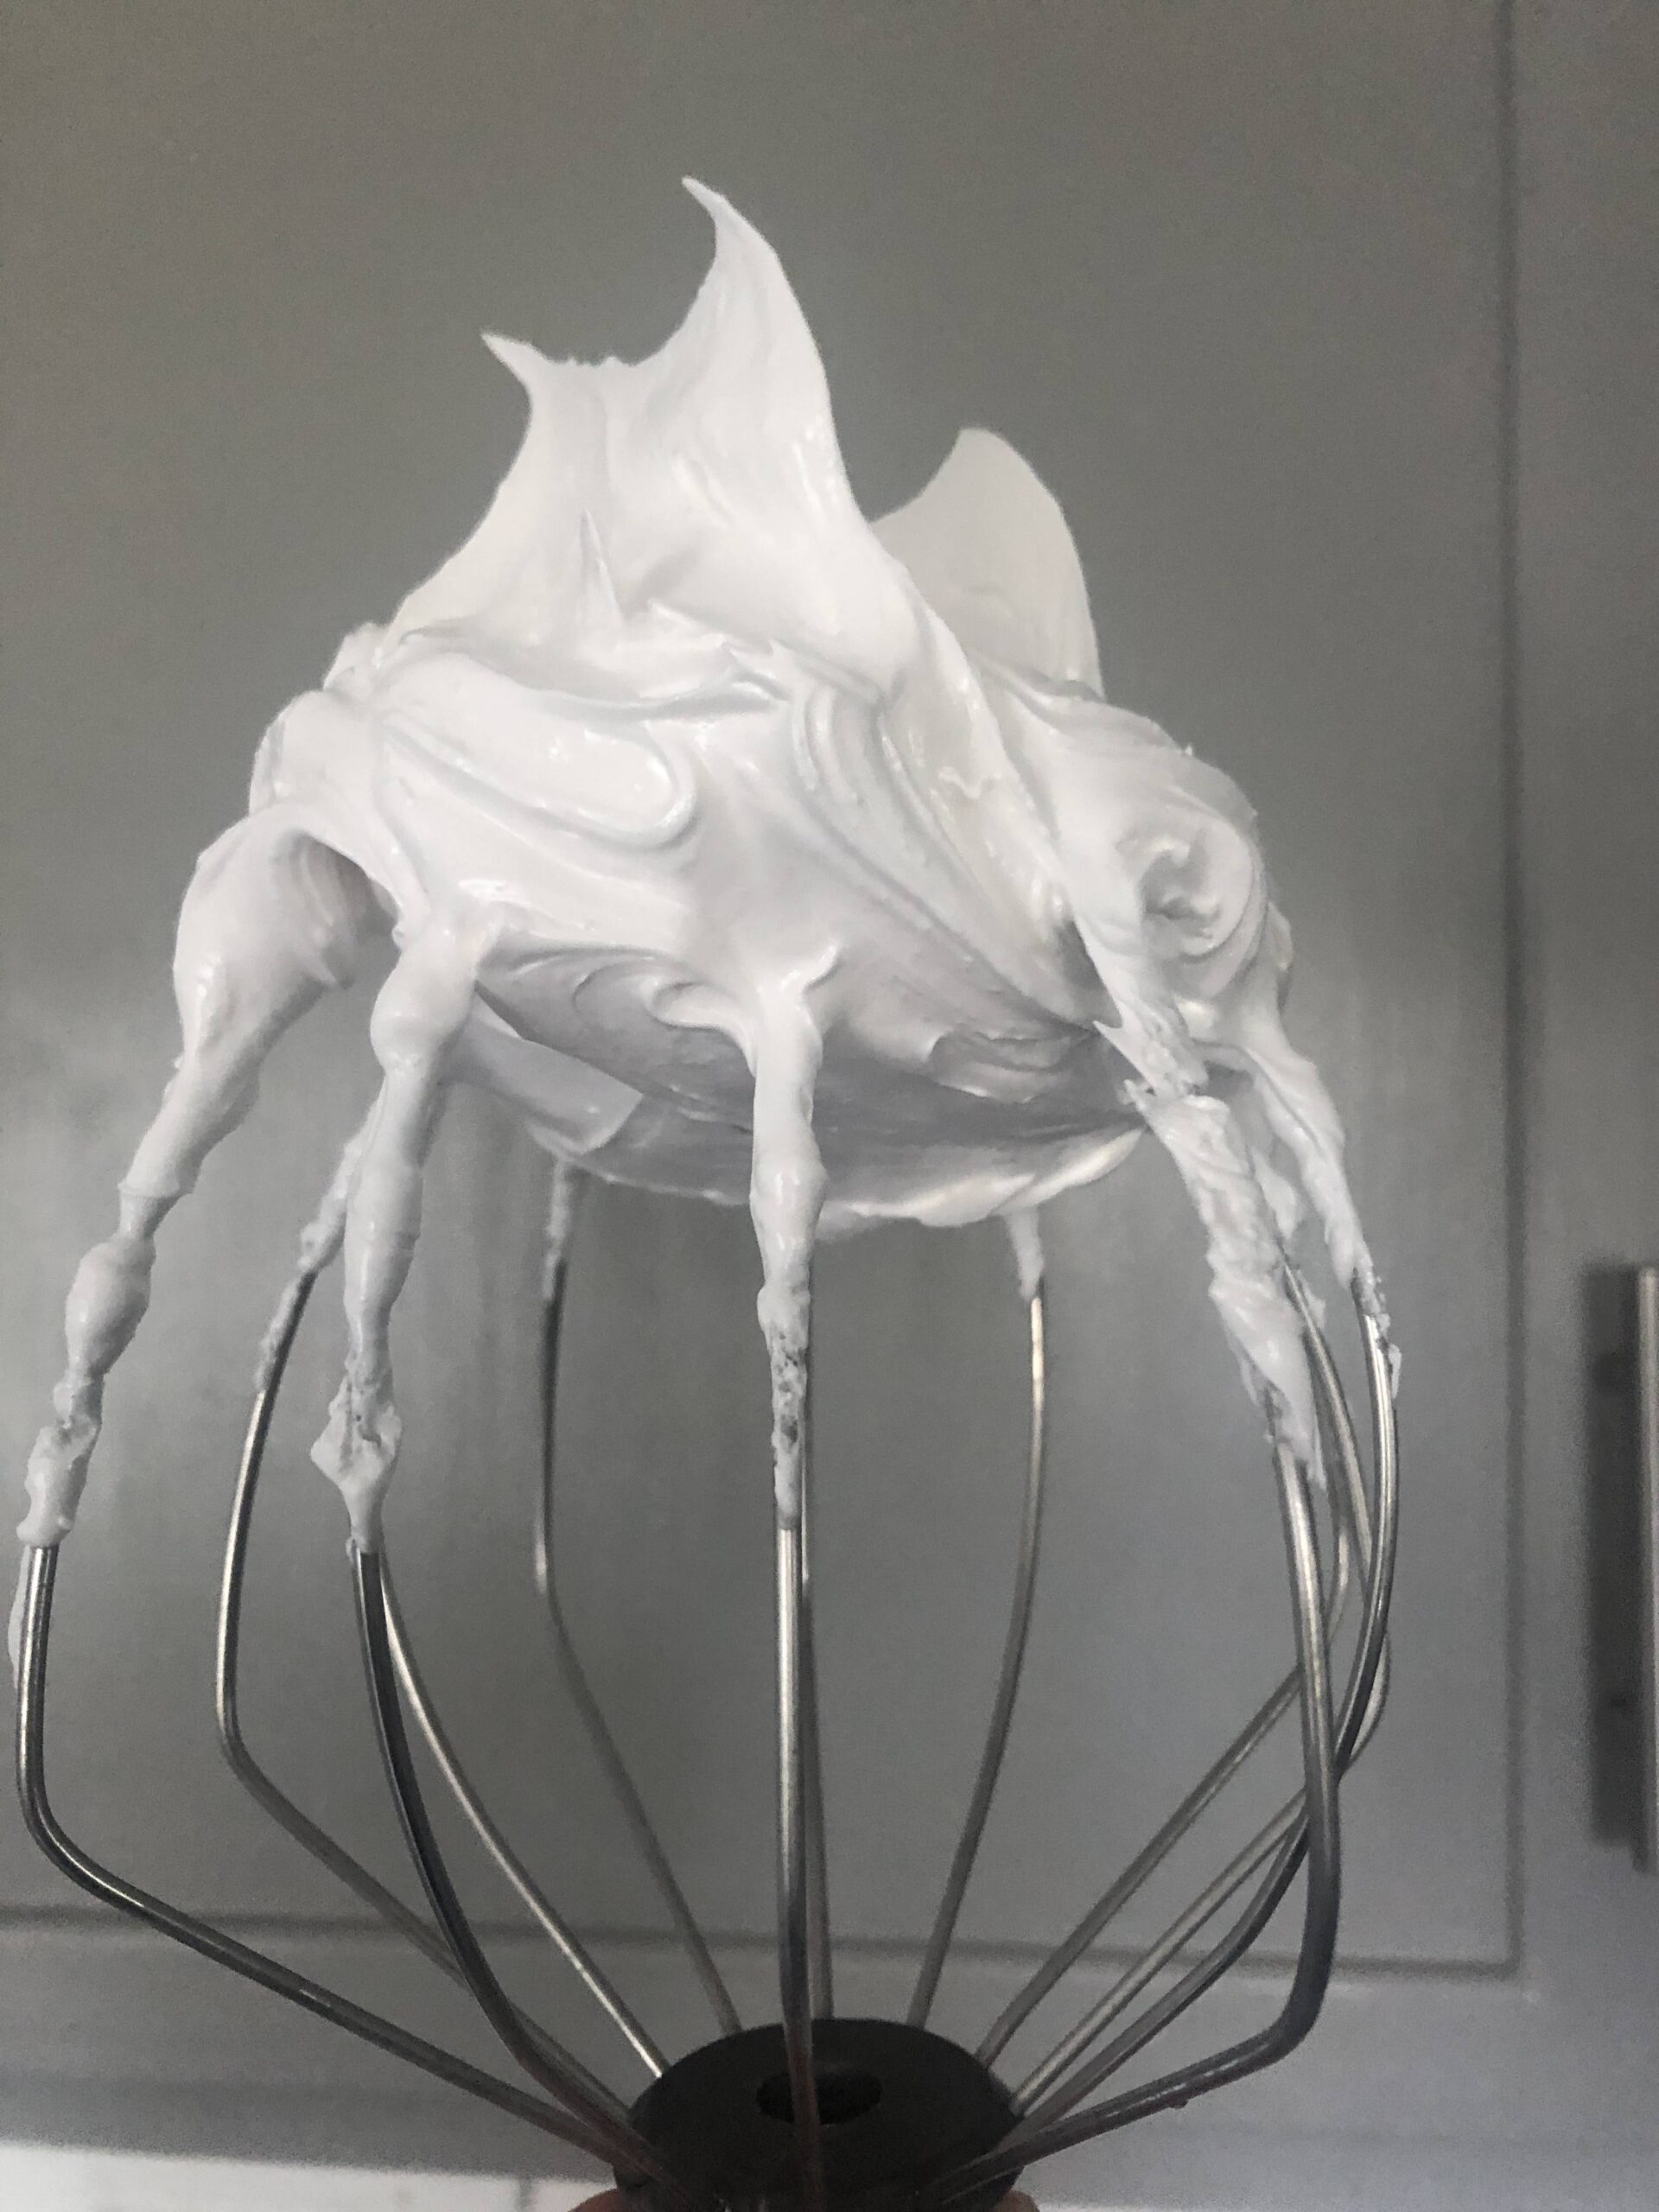
Once all of your ingredients are in the bowl of a stand mixer, start your mixer! Beat the room temperature egg whites, cream of tartar, and vanilla extract on med-high (I was at 6 on my KitchenAid) until soft peaks form. This will take approximately 3-4 minutes. The mixture will still look a bit ‘foamy’ but will be able to hold a soft peak – see picture below.

Once you achieve the soft peaks, you will now very slowly add your granulated sugar. Continue mixing on medium speed and add your sugar in 1 tablespoon at a time, every 10-15 seconds. The sugar addition took me about 3-4 minutes in total. Partway through, use a spatula to scrape any residual sugar stuck to the bowl into the mixture.
After the sugar has been fully incorporated, continue to beat on medium to high speed for an additional 3-5 minutes until stiff peak stage begins. The meringue will be glossy and will strongly hold its shape when you turn the whisk upside down. If the meringue mixture loses the glossy look and starts to look more matted, you have beaten too much.
Add Meringue to Piping Bags
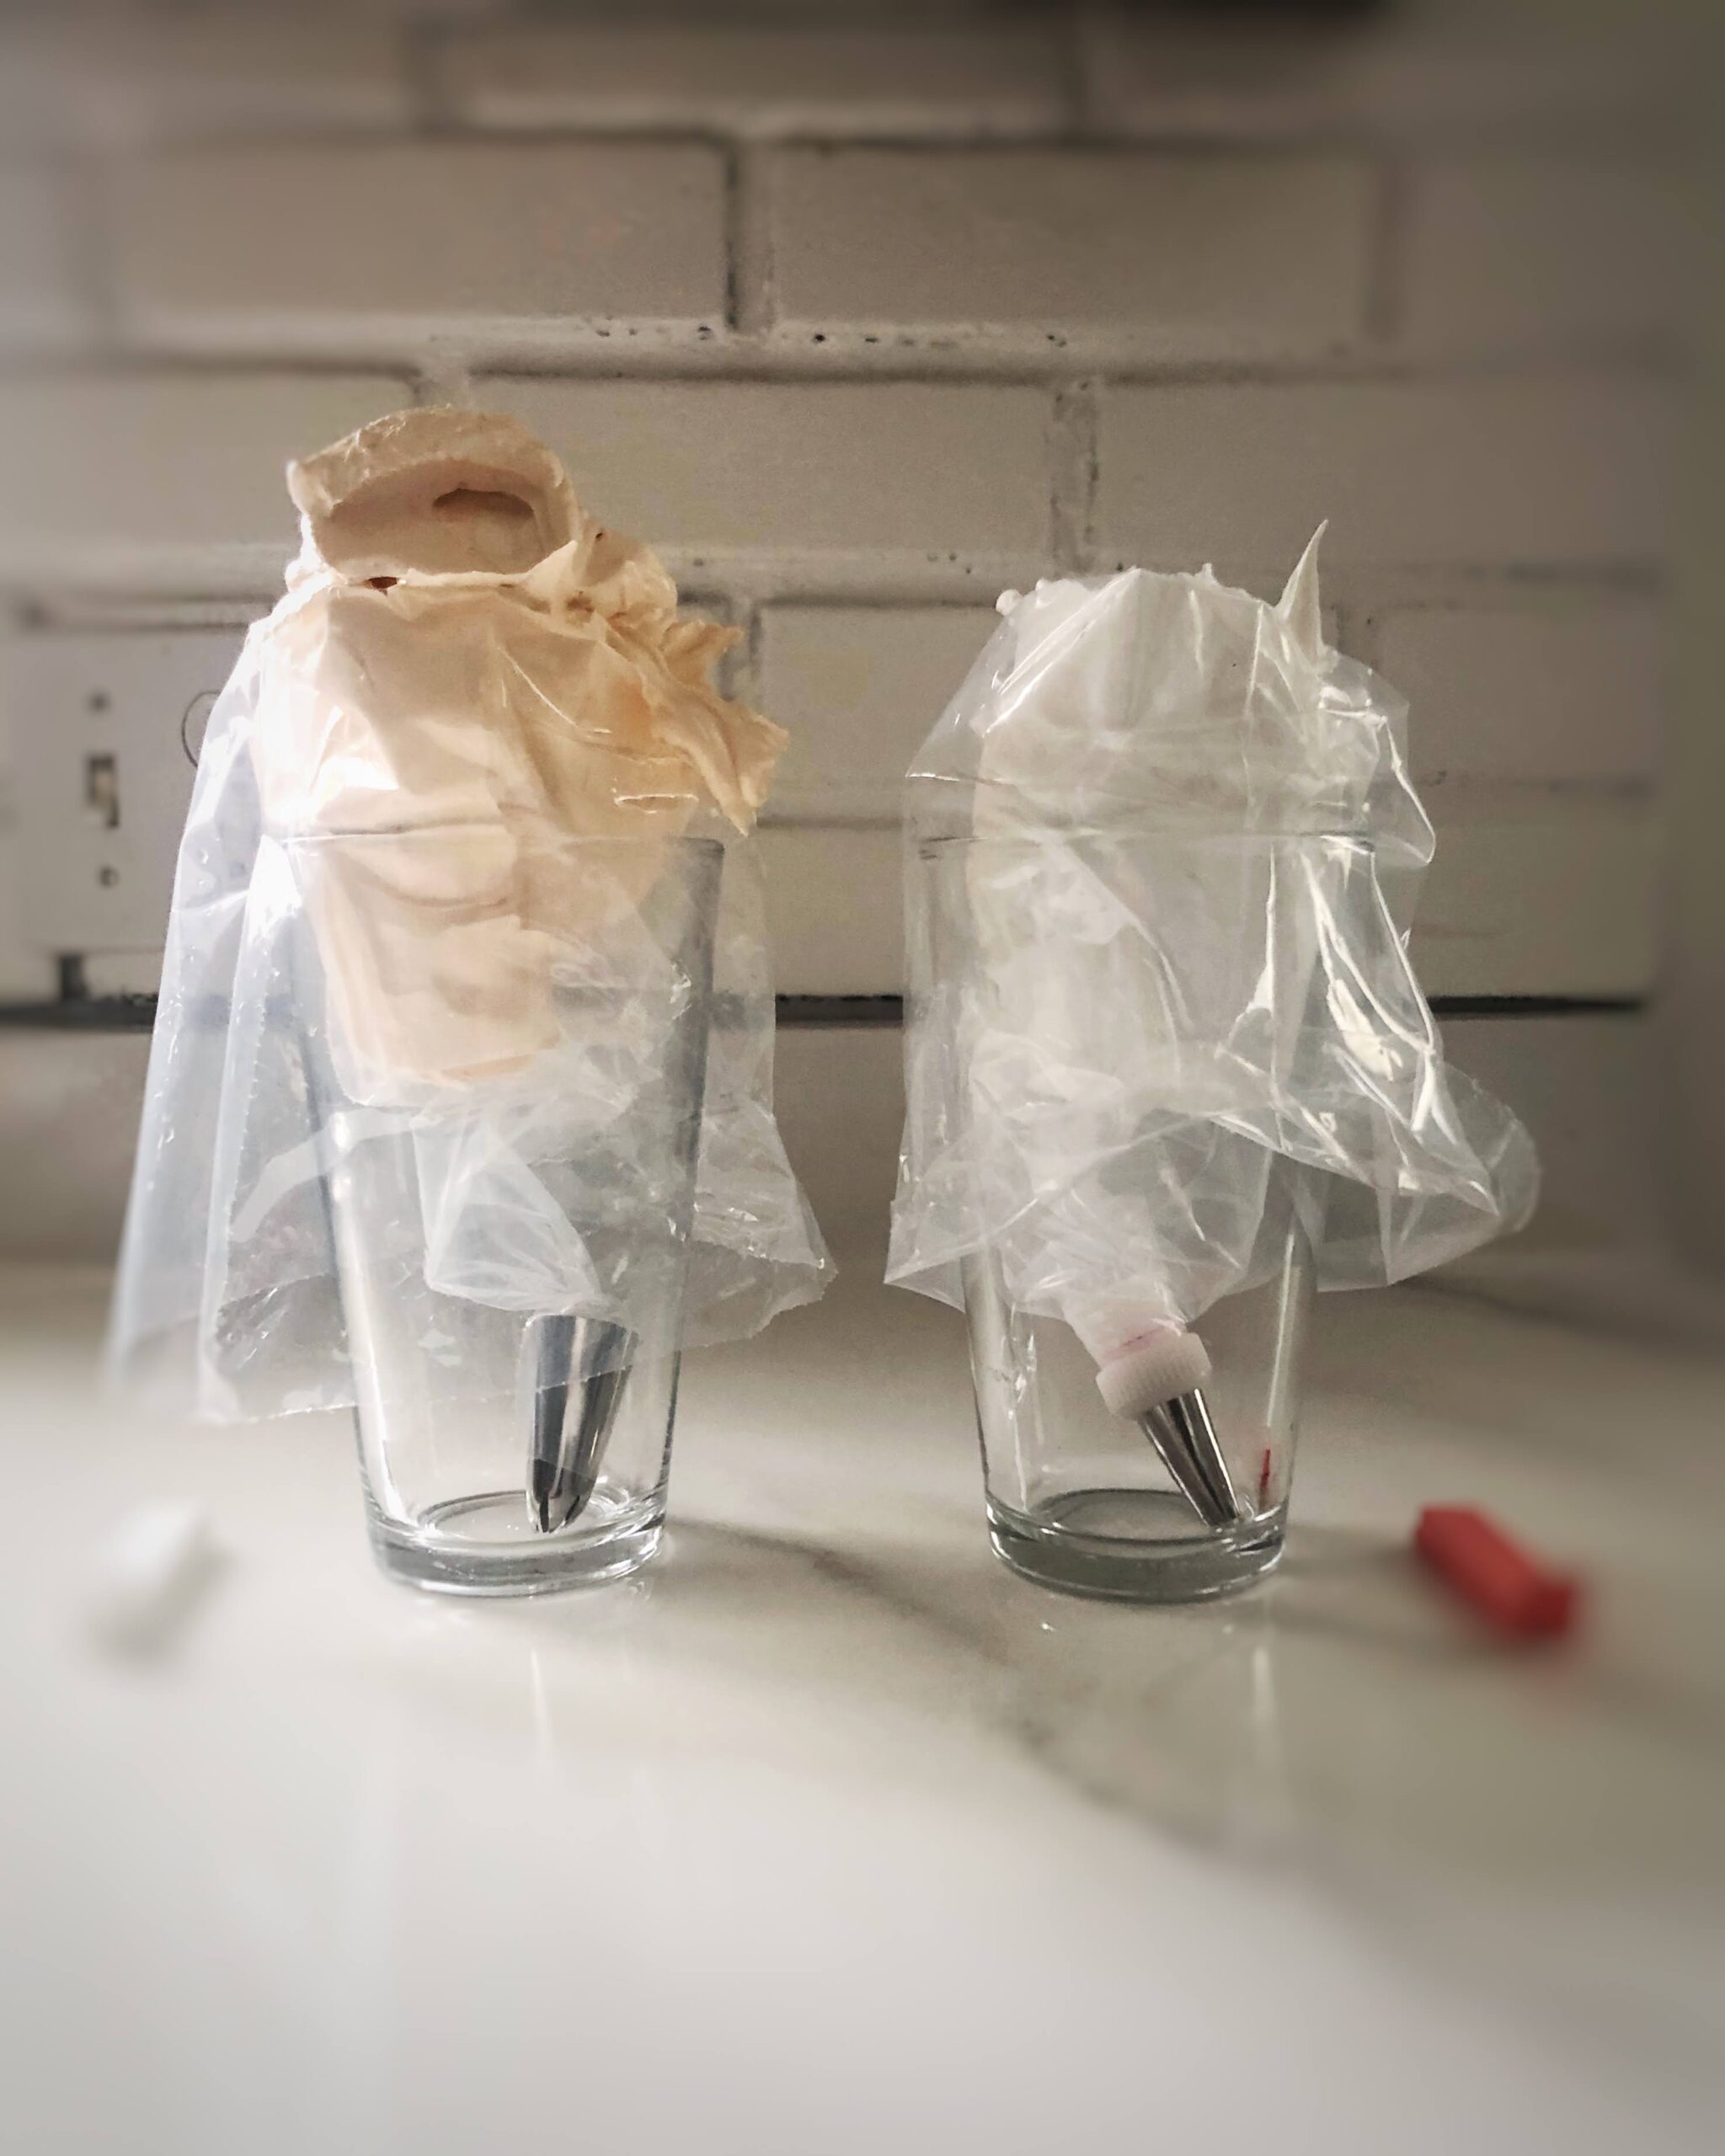
Fit two piping bags or pastry bag upright over tall glasses to make the meringue transfer easier. Using a spatula, remove about half of the mixture and transfer meringue to the piping bag fitted with a large round tip (I used Wilton 12). If you don’t have this tip, you can cut a small hole at the end of the bag.
Add a few drops of food coloring to the remaining meringue (I used 2 drops of AmeriColor Pumpkin) and beat in until just combined. As soon as the color is fully incorporated, stop the mixer. Add the orange meringue to the other piping bag fitted with a large star tip (1M).
Piping Your Meringue Cookies
Gather your prepared baking sheet and sprinkles and get ready to pipe! This is my favorite part of the process as your meringue finally gets to take shape.
Starting with the pumpkins and orange meringue, use consistent pressure and pipe up and down the shape of the pumpkin to form the pumpkin lines. Use the white meringue with the 12 tip to add the stem. For a touch of flair, add sprinkles to the pumpkin!
To pipe the ghosts, use the Wilton 12 tip and fill in the shape of the ghost. I started with one arm, making my way up to the top of his head, down to the other arm, and then finishing with the body. Using an offset spatula, flatten the meringue to even out the lines created by piping.
Add black circle sprinkles to create the eyes and mouth. You can typically get these sprinkles at Joann’s or Michael’s in a small pack for around $1. You can also use candy eyes.
Finish off the ghosts with some white sprinkles if you so choose!
Carefully slide out the paper templates from the tray.
Baking the Meringue
Place the piped meringue into the oven pre-heated at 220 degrees. Bake for approximately 60-70 minutes (though it may be more depending on how humid your climate is). Do not open the oven door until you hit the hour mark. Give one of the cookies a light tap. If it feels really soft, leave them in for another 10 minutes and check again. Once you tap the cookie, and there is slight give, but not too much, and the cookie feels a bit more stable and dry, they are done.
At this point, leave the cookies in the oven, shut the door, and turn off the oven. Leave the cookies in the turned-off oven for 1 hour. Once you remove, you should be able to easily remove the meringue cookies from the parchment paper.

Storing Your Meringue Cookies
Storage is very much dependent on the time of year and your climate's humidity level. As a rule of thumb, if stored in an airtight container in a cool and dry climate, you can probably get 5-7 days out of them. As soon as the meringue starts to absorb moisture, it will lose that classic crunch.
I don’t recommend freezing them because of the humidity when defrosting.
I hope you enjoy this fun and easy treat. Please share with me on social media if you make these.
More Halloween Recipes:


Halloween Meringue Cookies
Equipment
- Kitchenaid or Hand Mixer
- Baking Sheet
- Parchment Paper
- Piping Bags
- Piping Tip (Wilton 12 & 1M)
- Ghost and Pumpkin Template
Ingredients
- 2 Egg Whites Room Temperature
- ½ Cup + 2 tablespoon Granulated Sugar (135g)
- ¼ teaspoon Cream of Tartar
- ½ teaspoon Vanilla Extract
- ¼ Cup Sprinkles (approximately)
Instructions
- Preheat oven to 220° and prepare a baking sheet with templates and parchment paper. Prepare 2 piping bags with Wilton 12 and 1M tips.
- Place your egg whites, cream of tartar, and vanilla extract in a stand mixer fitted with the whisk attachment. Beat ingredients on medium-high (6 speed on Kitchenaid) for 3-4 minutes until soft peaks form.
- Slowly add in granulated sugar 1 tablespoon at a time. Make an addition every 10-15 seconds. This process will take around 3-4 minutes.
- Once all of the granulated sugar has been added, continue to beat on medium-high for another 3-5 minutes until meringue holds stiff peaks and is glossy.
- Add half of the meringue into the piping bag fitted with the 12 tip. Add food coloring to the stand mixer and beat until incorporated - add to the other bag fitted with the 1M tip.
- Add a small dollop of meringue to the corners of your parchment paper to help it stay flat on the tray. Use the 1M tip and pip up and down along the shape of the pumpkin and use the white meringue for the stem - add your sprinkles! To pipe the ghosts, use the white meringue and fill in the body of the ghost, flattening out the line with an offset spatula. Add your eyes and mouth.
- Carefully slide the paper templates out from the tray.
- Place the tray of meringue cookies into the preheated oven for 60-70 minutes. Don't open the oven until the first 60 minutes have passed. At this point, lightly tap your meringue to feel the consistency. If it feels too soft, allow them to continue baking for another 10 minutes or until the cookies feel more only slightly soft and are more stable.
- Turn off the oven but leave the meringue cookies in the closed oven for another 60 minutes.
- Remove from oven and enjoy!
- Store in an airtight container for 4-7 days (depending on how humid your climate is).


