These easy Halloween sugar cookies are so much fun to make and are perfect Halloween treats. Using my go-to and favorite sugar cookie recipe, you can make the perfect soft and delicious sugar cookie for Halloween parties or just for fun! I (almost) always use royal icing to decorate sugar cookies as it allows you the flexibility to make very detailed decorations. The icing will also dry hard, which makes transporting these cookies a breeze. Though royal icing can be intimidating, it really isn't that difficult. With a bit of practice and patience, you can make your own adorable Halloween Sugar Cookies Decorated with Royal Icing. I'll break down how to make these cute Halloween Cookies!
If you are new to decorating cookies with royal icing, check out my Ultimate Guide to Royal Icing for a great overview of what exactly royal icing is, what supplies you need, and some best practices and tips for creating your own decorated sugar cookies.
Looking for more Halloween or fall-themed recipes? Try these Adorable Meringue Ghost and Pumpkin cookies or these pumpkin chocolate chip cookie bars!
Disclaimer: This post may contain affiliate links, meaning I may get a small commission if you decide to make a purchase through my links at no cost to you.
Why You'll Love These:
- I've been using my cut-out sugar cookies recipe for years now. It is simple to make and creates tasty and durable cookies for decorating. These cookies do not rise and have nice clean edges which makes them great for decorating both simple and complex designs!
- Other recipes you could try for these Halloween cutouts include Pumpkin Sugar Cookie Cut-outs or Cookies n' cream Cut-Out Sugar Cookies.
- You can decorate these with royal icing. I will give you my best tips and tricks to create these cute and easy Halloween cookies. Although royal icing can be a bit 'scary', you can really make cookies as simple or detailed as you are comfortable.
Supplies
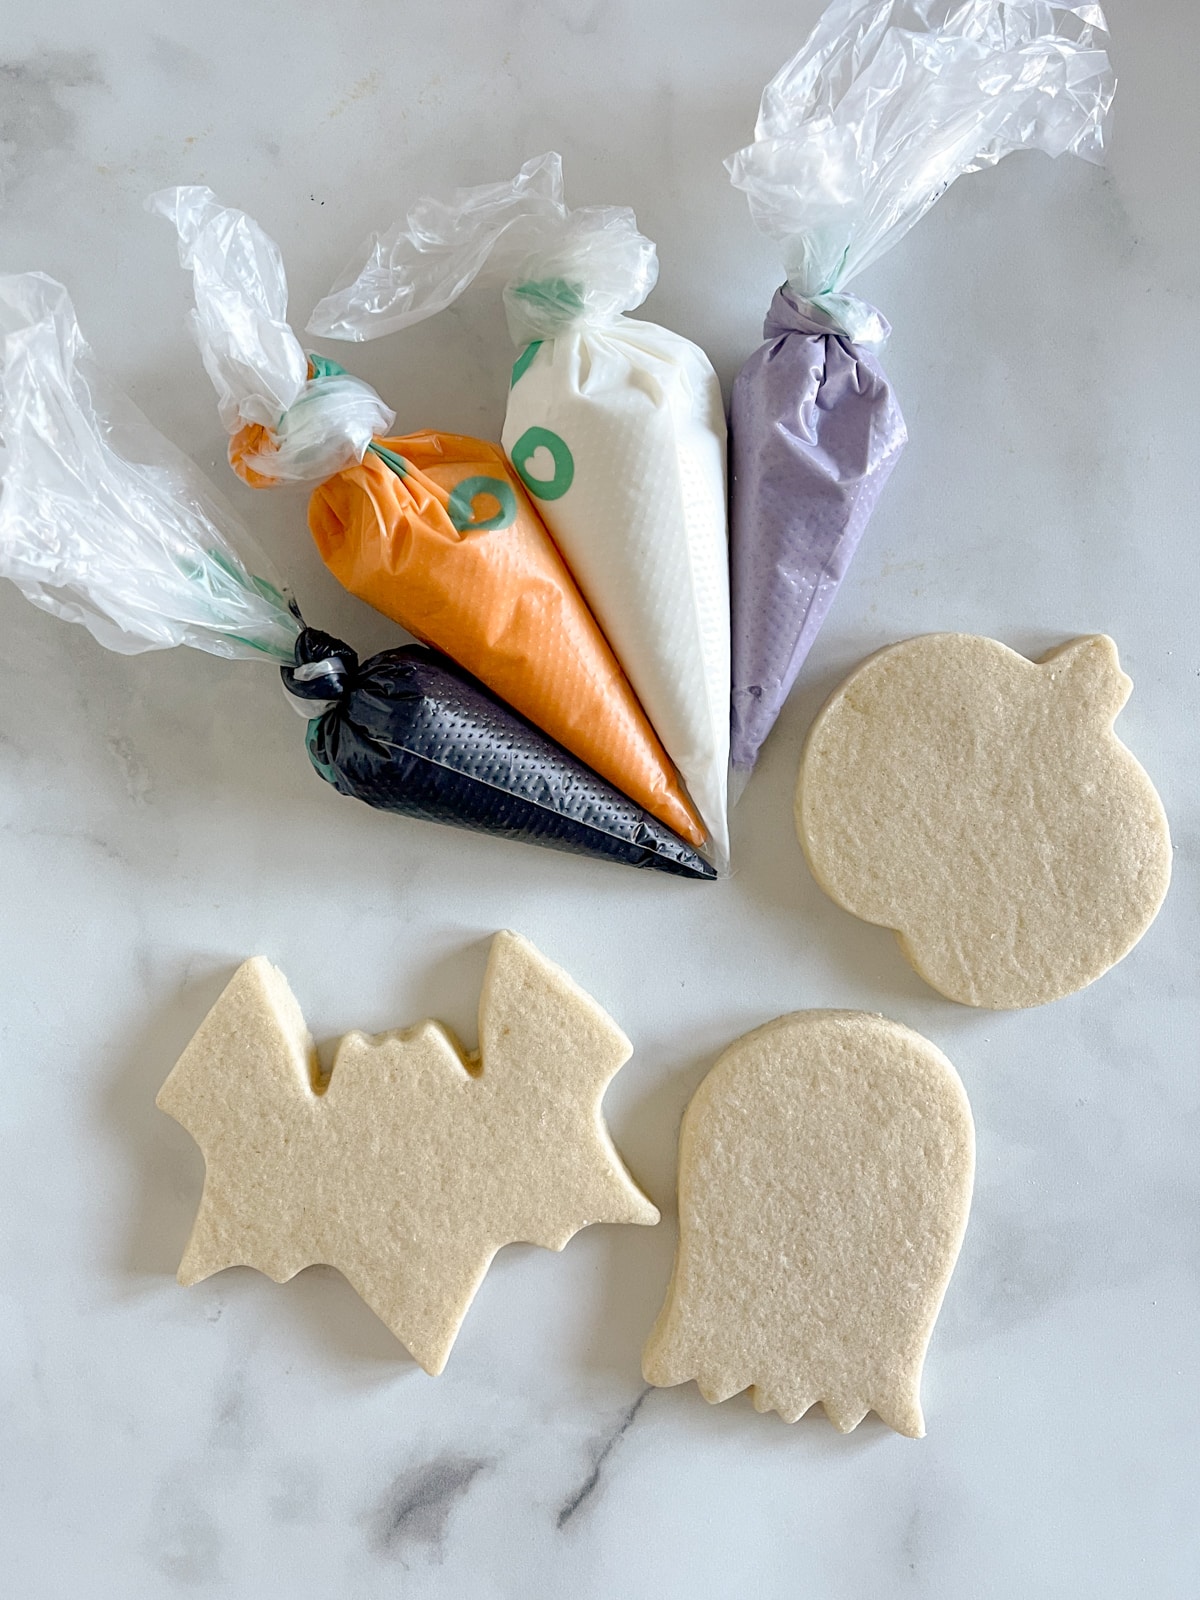
- Halloween Cookie Cutters. For these designs, I used pumpkins, ghosts, and bats. If you don't already have cookie cutters, you can purchase this set (or these ghosts!). During the fall, I'm sure it won't be hard to come across these shapes in your store too. For the ghost, you can also use an upside-down tulip!
- Rolling Pin. Ideally a rolling pin with a way to measure the thickness of your cookie dough. You can use dough sticks or this rolling pin works great! I typically make my cookies about ¼" in thickness.
- Wax Paper. This is optional, but it makes rolling out sugar cookie dough SO much easier.
- Silicone Mats or Parchment Paper. I always bake my cookies on one of these two things. Silicone mats are my preference, but parchment paper works well too. They prevent the cookies from sticking to the cookie sheet and also help them to bake more evenly (especially the silicone baking mat as it transfers heat more evenly).
- Electric Mixer. Either a hand mixer or stand mixer with a paddle attachment is perfect for the sugar cookies. For the royal icing, I always use my hand mixer as I find it easier to control how much you mix and how thick (or thin) the icing really is.
- Piping Bags. I use tipless piping bags and cut off the tip according to how thick is needed for the icing to decorate the cookie. However, if you prefer to use piping tips, couplers, and piping bags, that works too! Read more about the difference in my Ultimate Guide to Royal Icing.
- Scribe Tool or Toothpick. Using a cookie scribe is super helpful to spread and even out royal icing across the base of the cookie. Toothpicks work really well too!
- Edible Pen. This is optional, you can definitely create these designs by piping very thin black lines. However, a thin-tipped edible pen (like this one) will make your life much easier.
- Pink Luster Dust. This is used to make the rosy cheeks on these shapes. It is completely optional though. To apply, you will mix a bit of the dust with just a few drops of water and add to the cookie with a brush or sponge.
- Cookie/Cake Decorating Brushes. You will use these for the blush cheeks with the pink luster dust.
Ingredients You Will Need
Halloween Sugar Cookie Recipe Ingredients:
- Unsalted Butter
- White Sugar
- Egg
- Vanilla Extract
- Baking Powder
- Salt
- All Purpose Flour
- Heavy Cream
Royal Icing Recipe Ingredients:
- Powdered Sugar
- Meringue Powder
- Water
- Corn Syrup (optional)
- Gel Food Coloring (Orange, Purple, Black, White)
Tips for Making Cookies:
- This recipe works best when you are able to freeze the dough for 10-15 minutes after rolling it out to get crisp shapes and even edges. If you opt not to freeze the dough, the recipe will still work, but the shapes may not come out quite as nice.
- Using this style of a rolling pin or these dough sticks are clutch if you make sugar cookies even occasionally! They will make your life so much easier and create nice evenly baked cookies. Especially when using royal icing, if the cookies are not even, the flood icing will run to the side that is more slopped down.
Making Royal Icing:
- For these designs, you will need the following icing colors and consistencies. Here is my full royal icing recipe which explains in detail how to make the icing and the different consistencies you will need.
- White: Flood and Detail Consistency
- Orange: Flood and Detail Consistency
- Purple: Flood and Detail Consistency
- Black: Detail Consistency (just a small amount for the pumpkin stem)
- If possible, use white icing food coloring. If you do not, the royal icing will not be bright white and will dry slightly off-white (the cookies will still be adorable even without the white coloring though :).
- You can easily use candy eyes instead of drawing or piping on the eyes for the pumpkins, ghosts, and bats!

Cookie Decorating Steps
Pumpkin:
Using your orange detail consistency icing, outline the shape as shown below. Make sure there is enough space in the middle section of the pumpkin to allow room to create the eyes and smile of the pumpkin.
Fill in the center of the pumpkin with orange icing and use a cookie scribe or toothpick to spread. Allow this section to slightly dry before flooding the sections on the outside.

Flood/Flooding: The process of filling in a section of your cookies with your flood consistency icing. Flood consistency icing is thin and will spread easily, essentially 'flooding' through the base of the cookie. Because of the thin consistency, the icing will dry even and flat, the perfect base for adding more decorative touches to your cookie.
Once the middle section of the pumpkin crusts over (this will take about 10-15 minutes), add the orange flood icing to the exterior edges.
With the detailed consistency black icing, pipe a thick line for the stem.
Once the flood icing is fully dried (this will typically take at least 8 hours, potentially more in a humid climate), draw or pipe the eyes and mouth. Also, add your blushed cheeks by mixing the pink luster dust with a few drops of water (or vodka) and lightly painting it on the cookie.
For more information on drying royal icing cookies, check out this article!
Note: If you are using candy eyes instead of piping or drawing on eyes, make sure to add to the icing before it dries to allow for them to harden in the icing.
Ghosts:
Using the detail consistency white icing, pipe a line around the edge of the cookie. Fill in the line with flood-consistency white icing. Let the icing harden completely, for at least 8 hours or overnight.
Once the ghost is completely dry, using an edible marker, make the eyes and a smile. You can write a fun message on the ghosts, such as "boo!". Add pink luster dust mixed with a few drops of water (or vodka) and add blush cheeks with a food brush.

Note: If you are adding candy eyes, add to the icing when still slightly wet.
Bat:
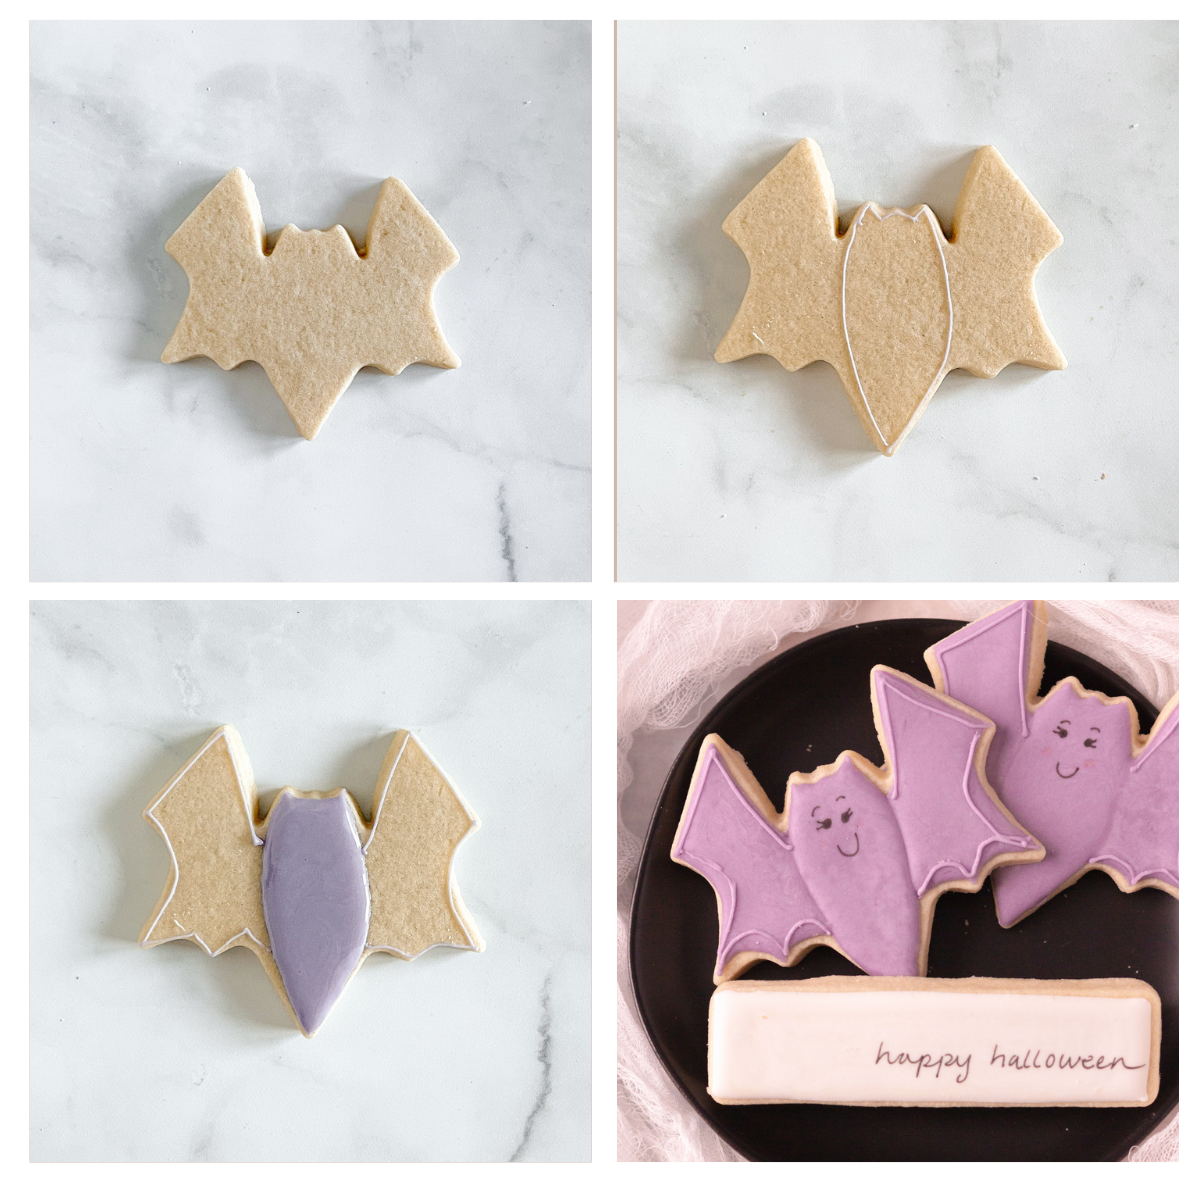
Outline the center portion of the bat with detail consistency purple icing as shown below. Fill in with flood-consistency purple icing and let dry for at least 10-15 minutes until it starts to crust over. Outline the wings with detail consistency and spread purple icing with a cookie scribe.
Once the icing is fully dry, draw on the eyes and mouth with an edible marker. With punk luster dust mixed with a few drops water (or vodka) add rosy cheeks. With the detail consistency purple, outline the bat wings as shown below.
Storage
Cookies can be stored in an airtight container for up to 5 days or in the freezer for up to 3 months. To remove from the freezer, allow the cookies to come to room temperature without opening the container. Once they are room temp you can remove them and serve!
Royal icing made with meringue powder can be stored at room temperature for up to 1 week. HOwever, I recommend storing it in the fridge or freezer. If you use another recipe with real egg whites these time frames will not hold true and please follow your specific recipe storage instructions. You can store the royal icing bags in a sealed zip lock bag or airtight container in the fridge for up to 2 weeks or up to 6 months in the freezer.
Other fun fall recipes to check out:
- Pumpkin Chocolate Chip Cookie Bars that will Change your Fall
- White Chocolate Mummy Cakesicles [Kid Approved]
- Snickerdoodle Cookie Dough Truffles
If you try these cute Halloween cookies, tag me in a post, I'd love to see your creations!

Halloween Decorated Sugar Cookies
Ingredients
- 1 cup Unsalted Butter (softened to room temperature)
- 1¼ cup Granulated Sugar
- 1 Egg
- 2 teaspoon Vanilla Extract
- ⅛ teaspoon Salt
- ⅛ teaspoon Baking Powder
- 3 ½ cups All-Purpose Flour
- 2 tablespoon Heavy Cream
Royal Icing Recipe
- 4 cup Powdered Sugar
- 2 tablespoon Meringue Powder
- ¼ cup water (plus a few extra teaspoons until you reach the right consisteny.
Instructions
- Preheat the oven to 350 degrees. Line baking sheet with parchment paper or silicone mats. Set aside.
- In a large bowl, using an electric mixer cream butter and granulated sugar on high for about 30 seconds to 1 minute. Beat until the mixture is fluffy and light in color.
- In a small bowl add the egg, vanilla, baking powder, and salt. Add this entire mixture to the butter and beat on medium speed for about 30 seconds until well mixed.
- Add the flour 1 cup at a time to the wet ingredients and beat with your mixer on low speed. Gradually add the remainder of the flour until all is incorporated. Make sure to scrape down the sides of the bowl as you go. The dough will be slightly dry at this point.
- Pour the heavy cream into the dough and beat on high speed for 10-15 seconds until the dough moistens and comes together.
- To prevent the cookie dough from drying out, wrap in plastic wrap or cover the bowl in plastic wrap if you are baking immediately.
- Take about half of your cookie dough and place on a piece of wax paper. Shape the dough into a long, log shape.
- Place another piece of wax paper on top of the dough log and roll out the cookie dough to approximately ¼" in thickness.
- Place rolled dough in the freezer for 10-15 minutes or until it is firm, but not frozen solid.
- Cut out Halloween shapes and place on a prepared baking sheet. Baking time will range from 11-14 minutes or until the outer edge of cookies are a light golden brown color.
- Let cool on a cookie sheet for about 5 minutes before transferring to a wire rack to cool completely.
- Do not decorate cookies until they are completely cool for at least several hours.
- Make the royal icing using this recipe! Dye the icing into different colors including white, orange, purple, and black. You will need a flood consistency and a detail consistency for white, orange, and purple.
- Decorating the Pumpkin: With the orange detail consistency icing, outline the pumpkin and add 2 curved lines up the middle creating the shape of the pumpkin. Fill in the middle section of the pumpkin with the orange flood icing. Allow the center section to slightly dry, the top should appear less shiny (10-15 minutes) and then fill in the flood in the 2 outside pieces. With the black detail icing, pipe the stem of the pumpkin. Allow cookie to dry for 8 hours up to overnight. Using the edible marker, create eyes and smile. Mix pink luster dust with a few drops of water or vodka and using a food-safe brush, add blush cheeks.
- Decorating the Ghost: With the white detail icing, outline the ghost. Fill in the center with flood white icing and allow to dry for 8 hours or overnight. With the edible marker, add the eyes, mouth, and the "boo! message. Using the same pink luster dust mixture as with the pumpkins, add blush cheeks.
- Decorating the Bat: With the purple detail consistency icing, outline the center portion (the body) of the bat. Continue with the detail consistency icing and outline the wings. Fill in the body of the bat with the flood purple icing and let it slightly dry (at least 10-15 minutes) before filling in the wings with the purple icing. Let the cookie dry at least 8 hours or overnight. Once dry, add the eyes and mouth with edible marker and add accents to the wings.
- For step by step pictures, see the pictures in the blog post!
