Valentine’s Day has never been one of my favorite holidays as far as giant romantic gestures and expectations go. However, I do love it as a day to plan a fun date with my husband or pass out treats to the people I care about. Enter, these super cute Valentine’s cookie pops! These are sugar cookies, decorated with royal icing, and packaged with a cute bow. These cookie pops are so much fun to make. Personalize the sayings and colors for great gifts for your favorite people. I’ll walk you through step by step to make these Valentine's day treats for any level of cookie decorator.
Disclaimer: This post may contain affiliate links, meaning I may get a small commission if you decide to make a purchase through my links at no cost to you.

Ingredients for Valentine’s Day Cookie Pops
Sugar Cookies
- Butter
- Granulated Sugar
- Eggs
- Vanilla Extract
- Baking Powder
- Salt
- All Purpose Flour
- Heavy Cream
Royal Icing
- Powdered Sugar
- Meringue Powder
- Water
- Food Coloring
- Corn syrup (optional)
- Clear vanilla extract (optional)
Cookie Pop Supplies
- Lollipop sticks (at least 6”)
- Heart Shaped Cookie Cutters
- Hand Mixer or Stand Mixer
- Tipless Piping Bags
- Cookie Scribe (or toothpick)
- Tissue Paper
- Edible Marker
- Sprinkles (optional)
- Treat Bags
- Ribbon

Sugar Cookie Recipe
To create these fun Valentine’s Day sweet treats, the first step is making your sugar cookie dough. This easy sugar cookie recipe makes flat sugar cookies that do not spread, so they are perfect for royal icing cookie decorating. I’ll briefly walk you through the steps here, but if you want a very detailed and thorough guide, here is the full recipe. If you want to try a different flavor for cut out cookies I also have recipes for Chocolate Chip Cookie Cut-Outs, Cookie and Cream Cut-Outs, and Almond Cookie Cut-Outs!
Mixing the Cookie Dough
In a large bowl, add your softened butter and granulated sugar. Using a hand mixer or stand mixer, beat on high for about 2 minutes, until the mixture is fluffy and lightened in color.
In a separate bowl add your egg, baking powder, salt, and vanilla. Add this mixture to the butter and sugar, cream on medium for about 1 minute or until ingredients are well combined.
Slowly add all-purpose flour, ¼ cup to ½ cup at a time, and beat well between addition. Make sure to scrape the side of the bowl between additions to make sure all of the flour is incorporated. Once all of the flour is combined, the dough will look a bit dry and be in large clumps. Add heavy cream and beat on high until the dough just comes together. As soon as you can roll it into a ball with your hands, you are done. The dough will be slightly tacky, but not super sticky!
Rolling Dough for Cookie Pops
Heat oven to 350 degrees and line your baking sheets with parchment paper or silicone mat. Roll out your cookie dough to either ⅜” or ½” inch thick using a rolling pin with thickness rings or dough sticks. These help to keep the dough the same thickness for consistent baking. I like to roll the dough between two sheets of wax paper.
Making your Cut Outs
With your heart-shaped cookie cutter, cut out the shapes and place cookie dough pieces on a lined cookie sheet. You can use any size cutter you would like, but I recommend one that is at least 3 ½ - 4” wide to be able to fit the designs. Once the shapes are on a baking sheet, place them in the freezer for 10-15 minutes. You want the dough to be hard, but not frozen solid. If it’s too frozen you won’t be able to get the sucker stick through the dough easily.
Save a small ball of dough for troubleshooting later!

Adding Lollipop Sticks to Cookie Dough Pieces
Once the dough is done in the freezer, it is time to add the cookie sticks. Use lollipop sticks that are at least 6” in length. I used 6” and 8” sticks for variety. Place your hand on the top of the cookie and slowly but steadily push the stick through the cookie until the top of the stick is at least halfway up the cookie shape. Try to keep the stick as centered as possible within the height of the dough. Keeping your hand on top of the cookie will allow you to know if the stick starts to shift too high in the dough.
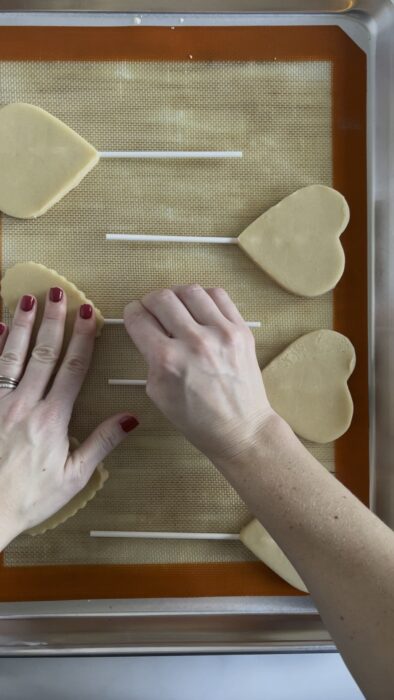
Once the stick is inserted, check the bottom of the cookie to make sure it didn’t start to pop through the bottom. If the stick did come through the bottom of the cutout, take a bit of that dough you saved and patch over the cookie stick.

Baking Your Cookie Pops
Place your valentines cookie pops in your preheated oven. Bake for 14-16 minutes or until the bottom edges are a light golden brown and the top of the cookie is no longer shiny. Remove from the oven and let the cookies cool on the baking sheet for at least 10 minutes. Before you move the cookie, you want to make sure it is cooled and the lollipop stick is set so it doesn’t shift and pop out of or break the cookie.
Once they are almost cooled, you can let the cookie cool completely on a rack, make sure it is on a flat surface. While cookies are cooling you can move on to make your icing!

Making Royal Icing for Cookie Pops
Here is the order of operations for making and dying icing. Keep reading to get detailed descriptions for each step!
- Make royal icing recipe in large mixing bowl
- Take about ⅓ of the icing and add to a small mixing bowl (cover the large bowl of royal icing with a wet paper towel to prevent it from drying out).
- Add light pink gel food coloring and mix.
- Add water slowly to get the light pink icing consistency to that of detail icing - scoop a small amount of the icing and add to a piping bag.
- Add more water slowly until you achieve a thick flood icing. Add the remainder of the light pink icing to a piping bag.
- Repeat steps 3-5 with the bright pink and teal icing.
- Save a very small amount of icing for black. You only need to make black in detail consistency.
Now it is time for my favorite part, cookie decorating! If you are a beginner at royal icing cookie decorating, this ultimate guide will be useful!
I will briefly walk you through the steps to make royal icing, but if you want super in-depth instructions, check out my full post on my royal icing recipe!
In a large bowl add 4 cups of confectioners sugar (ideally sifted or at least make sure there are no chunks), 2 tablespoons of meringue powder, and ¼ cup of water. Beat on low for 30 seconds to 1 minute. The icing will be very clumpy.
OPTIONAL: At this point, you can add a few teaspoons of corn syrup which will give the cookies a shine and a soft bite when dry. ½ teaspoon clear vanilla extract can also be added at this point You do NOT need to add either of these ingredients, they are absolutely optional!
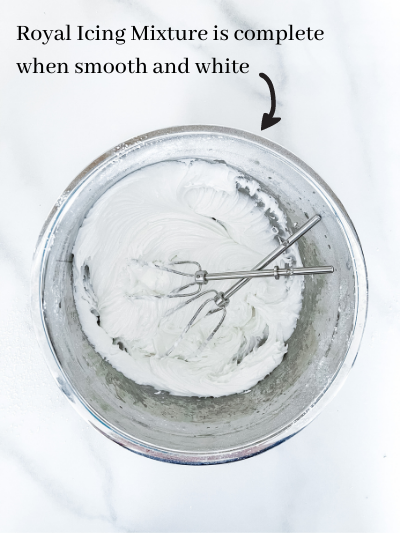
Continue adding water slowly, no more than ½ teaspoon at a time, and beat on low until the icing thickens, turns white, and is smooth. For a very detailed description of how to make royal icing, you can check it out here.
Coloring your Royal Icing
At this point, you can begin to color your royal icing. Take about ⅓ of the icing out of the large mixing bowl and add to a small mixing bowl. While you are doing this, make sure to cover your icing with a lid or a wet paper towel to keep it from hardening. Using gel food coloring, dye the icing in the small bowl and add to the piping bag. I get the icing to the consistency of the thickest I need for that specific color, add that portion to a piping bag, and then thin out the icing to the next thickest icing, etc.
For my designs, I chose to use light pink, bright pink, teal, and black. I use Americolor gels to color the icing. I recommend using gel paste as you will get very rich colors. The formulas I used are listed below, or feel free to use your favorite colors!
- Light Pink (Americolor dusty rose + 1 dot of Americolor royal purple)
- Bright Pink (Americolor electric pink + 1 dot of Americolor royal purple)
- Teal (Americolor teal)
- Black (Americolor black)
For each color, other than black, you will make two consistencies: a thick flood icing and a detail icing. For black, you only need detail.
Detail Icing
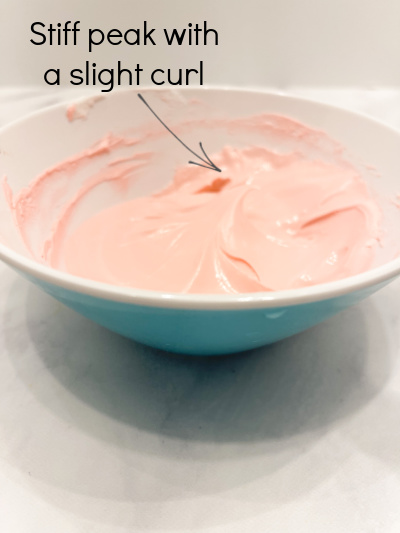
The detail icing will be used for outlining letters or writing text. To achieve this consistency, you will add water to the icing slowly until the icing is shiny, and when you lift it up, you’ll get a stiff peak with a curl at the end. It will be around the consistency of toothpaste, maybe on the slightly thinner side of toothpaste.
Thick Flood Icing
I chose to do a thick flood icing so I could use it for the base of the cookie, but also fill in letters with it. To achieve a thick flood consistency, you will need to slowly add water to the icing until you lift it up and let it drizzle back into the bowl, it will settle back into itself in about 15 seconds and a slight shake of the bowl.

Decorating Valentine Cookie Pops
Flood Base Layer of Sugar Cookie
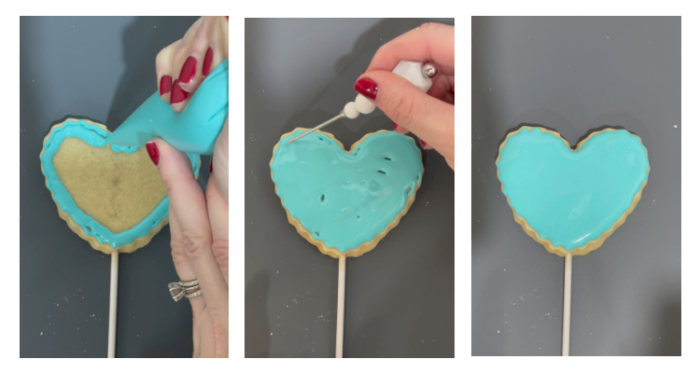
First, cut a very small piece off of the very tip of the detail icing piping bag. Cut a slightly larger tip off of the flood icing piping bag.
Since we are using thick flood icing, it can be used to outline and fill in the cookie. Start by outlining the exterior edge of the heart shape and fill in the outline with your flood icing in the corresponding color. Start on the outside and work your way in. Using a cookie scribe (or toothpick) maneuver the icing to fill in any gaps on the cookie and even out the icing. Slightly shake the cookie to help the icing settle.
Continue filling in all of the remaining heart cookie pops in each different color. Let them dry for at least 8 hours or overnight until you can touch the royal icing and it will be hard. Here are some tips for drying royal icing quickly and for making royal icing shiny!
Writing Valentines Cookie Pop Messages
To get the messages on each cookie pop, there are two ways to do it. First, if you have a projector for cookie decorating, download these images (or your own designs), project them onto the cookie, and copy the images.

If you don’t have a projector, you will need tissue paper, an edible marker, and a printer. Download the images, size them to fit your cookie, and print. Cut out a piece of tissue paper that is about ¼” larger than the printout of the design. Place the tissue paper over the printout and trace the image with the edible marker onto the tissue paper.
Center the piece of tissue paper with the tracing on the center of one of the heart cookies. Using the same edible marker, trace over the lines again. This will leave a thin outline on the cookie pop. Now all you need to do is follow the lines with your icing!
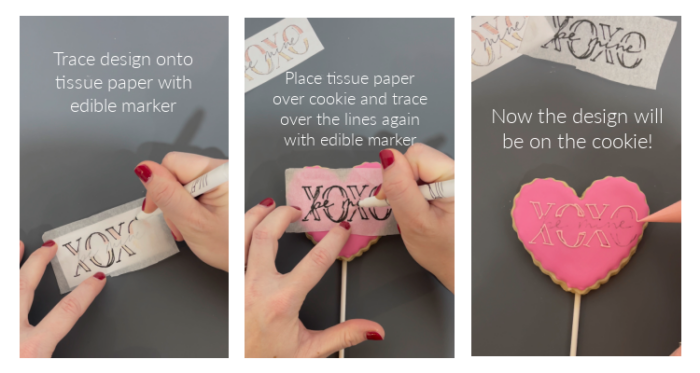
Repeat the process with the tissue paper tracing onto the remainder of the cookies. You can use each tissue paper 2-3 times before getting a new sheet out and retracing the original design from the printout.
Where the designs are thin lines, you only need to use your detail icing. For thicker lines, use the detail to outline and then fill in with the flood. Let dry in front of a fan.
Alternative Valentines Cookie Pop Ideas
If you don’t want to create your Valentines day messages with icing, you can simply draw or write them directly onto the cookie with your edible marker.
Instead of messages, you can also drizzle the icing onto the heart cookie and top with valentine sprinkles!

Once the cookies have dried completely, place the cookie pop into a treat bag and tie it with a ribbon.

Cooke Pop Storage
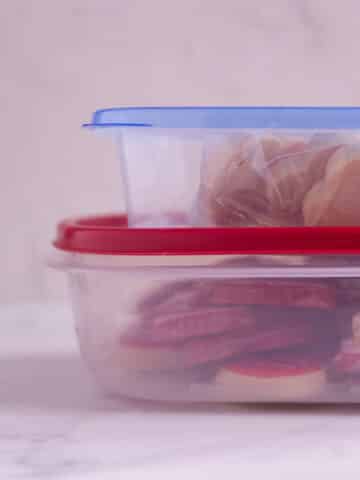
Once cookies are fully dried you can store them in an airtight container (these Rubbermaid ones are my favorite) for up to 5 days. If they are in a treat bag, you can stack them. If they are unpackaged, make sure you put a piece of parchment paper between each layer of cookies.
Cookies can be frozen for up to 3 months in an airtight container. When you remove them from the freezer, let them come to room temperature fully before opening the container.
For more information on cookie storage, check out my full guide on storing decorated cookies and royal icing!
You may also like these recipes:


Valentine's Day Cookie Pops
Ingredients
Sugar Cookies
- 1 cup Unsalted Butter (softened to room temperature)
- 1 ¼ cup Granulated Sugar
- 1 Egg
- 2 teaspoon Vanilla Extract
- ⅛ teaspoon Salt
- ⅛ teaspoon Baking Powder
- 3 ½ cups All-Purpose Flour
- 2 tablespoon Heavy Cream
Royal Icing
- 4 cups Powdered Sugar
- 2 tablespoon Meringue Powder
- ¼ cup Water (+ 1-3 extra tablespoons of water)
Instructions
Cut-Out Sugar Cookies
- Preheat Oven to 350° degrees. Line cookie sheets with silicone mats or parchment paper.
- Using a stand mixer or hand mixer, cream the softened butter and sugar for about 2 minutes on high. The mixture will start to look fluffy and lighten in color.
- In a small bowl, combine egg, vanilla, baking powder, and salt. Add this mixture to the butter and sugar, cream on medium speed until fully combined.
- Measure out flour in a separate bowl. Add to the butter/egg mixture about ½ cup at a time and beat on low. Continue adding in ½ increments until all of the flour has been added.
- At this point, the mixture will look slightly dry and crumby. Add the heavy cream and beat on high for 10-20 seconds. As soon as the dough starts to come together, stop beating. The sugar cookie dough will be very slightly tacky, but should not be sticky.
- In between 2 sheets of wax paper, roll out about half of the dough to ⅜" to ½" thickness. Roll out the other half of the dough in 2 additional wax paper sheets.
- With your cookie cutters, cut out the hearts and place them on a cookie sheet. Place the cookie sheet in the freezer for about 10-15 minutes. Make sure the dough is hard, but not frozen solid. Insert the lollipop stick through the bottom edge of the cookie until it reaches over halfway up the cookie.
- Bake for 14-16 minutes until the bottom edges are golden brown. Remove the baking sheet from the oven and let the cookies cool on the pan for at least 10 minutes. Move to a cooling rack and let cool completely.
Royal Icing Instructions
- Add powdered sugar to a large mixing bowl. Add the meringue powder and ¼ cup of water. Beat the ingredients on low for 30 seconds to 1 minute. The mixture will be very clumpy. Slowly add water, ½ teaspoon at a time, and continue to cream until the icing is smooth and white.
- Now that your cookies are baked and royal icing is made, follow the steps in the blog post for all of the decorating instructions!
